Best paintless dent repair tools for pros? Yeah, we’re diving deep into the gear that separates the weekend warriors from the true PDR masters. Forget those cheesy YouTube tutorials – this is the real deal, the stuff pros actually use to whip those dents into shape. We’ll cover everything from the basic tools to the high-tech stuff, so you can build your ultimate PDR arsenal.
This guide breaks down the essential tools, advanced techniques, and maintenance tips you need to know. We’ll compare different tools, discuss their functionalities, and even walk you through real-world case studies to show you how the pros get it done. Ready to level up your PDR game? Let’s go.
Introduction to Paintless Dent Repair (PDR) Tools

Paintless dent repair (PDR) is a specialized auto body repair technique that removes dents and creases from a vehicle’s body without the need for traditional body filler, sanding, or repainting. This method is highly valued by professionals because it maintains the vehicle’s original paint finish, resulting in a superior cosmetic outcome and saving both time and money compared to traditional repair methods.
The growing popularity of PDR has driven significant advancements in the tools used to perform this precise work.The evolution of PDR tools reflects a fascinating journey from rudimentary hand tools to sophisticated, specialized equipment. Early PDR techniques relied heavily on manual dexterity and simple tools like specialized hammers and push rods. These tools, often crafted by individual technicians, were limited in their ability to access difficult-to-reach areas and precisely manipulate the metal.
However, over time, technological advancements led to the development of more efficient and effective tools. The introduction of advanced lighting systems, for example, drastically improved the technician’s ability to see and manipulate the metal’s surface. Similarly, the development of specialized glue pulling systems and increasingly refined push rods revolutionized the accessibility and precision of the repair process.
Today’s PDR tools represent a remarkable blend of precision engineering and ergonomic design.
Types of Paintless Dent Repair Tools
PDR professionals utilize a diverse range of tools tailored to different dent types, vehicle access points, and desired outcomes. The selection and application of these tools require considerable skill and experience. A comprehensive tool kit typically includes several key components. For instance, a variety of specialized push rods are essential, ranging in size, shape, and tip design to effectively reach and manipulate dents in various locations and depths.
These rods, often made from high-quality materials like hardened steel, allow for precise manipulation of the metal. Furthermore, lighting systems, including LED and halogen lamps, play a crucial role in illuminating the dent’s characteristics and the surrounding panel’s surface to ensure precise repair work. These high-intensity lights help reveal subtle variations in the metal’s surface, aiding in the accurate application of force.
Finally, glue pulling systems, which involve attaching specialized glue tabs to the dent and carefully pulling the metal back into place, represent another critical component. These systems incorporate specialized glue guns, pullers, and release agents, each designed to minimize damage to the surrounding paint. The combination of these tools allows technicians to perform a wide range of repairs efficiently and effectively.
Essential PDR Tools for Professionals
So, you’re serious about paintless dent repair? Great! To become a true PDR pro, you’ll need more than just a steady hand – you need the right tools. This section dives into the must-have equipment for tackling even the trickiest dents. We’ll break down the functionalities of key tools and provide a comparison to help you make informed decisions for your tool kit.
Choosing the right PDR tools is crucial for efficiency and achieving high-quality repairs. The tools you select will directly impact your ability to effectively remove dents without damaging the vehicle’s paint. Investing in quality tools is an investment in your professional success.
Top-Rated PDR Tools Comparison
This table compares some of the leading PDR tools on the market. Remember, prices can fluctuate, so always check current listings.
| Tool Name | Manufacturer | Key Features | Price Range |
|---|---|---|---|
| GLUE PULLER KIT (Example: Dent Repair Kit A) | Generic Example Brand | Various sized glue tabs, professional-grade glue gun, pulling bridges, accessories | $100 – $300 |
| Slide Hammer (Example: Model X) | Example Tool Company | Adjustable length, durable construction, multiple tip attachments for various dent sizes and locations, ergonomic handle | $50 – $150 |
| LED Lighting System (Example: BrightLight PDR) | Illumination Solutions Inc. (Example) | High-intensity LED, adjustable brightness, flexible gooseneck, magnetic base | $150 – $400 |
| Reflective PDR Light (Example: DentView Pro) | Example Lighting Company | High-intensity LED, adjustable brightness and angle, portable and lightweight | $75 – $200 |
PDR Tool Functionalities
Understanding how each tool works is essential for effective dent repair. Different tools are best suited for different dent types and locations.
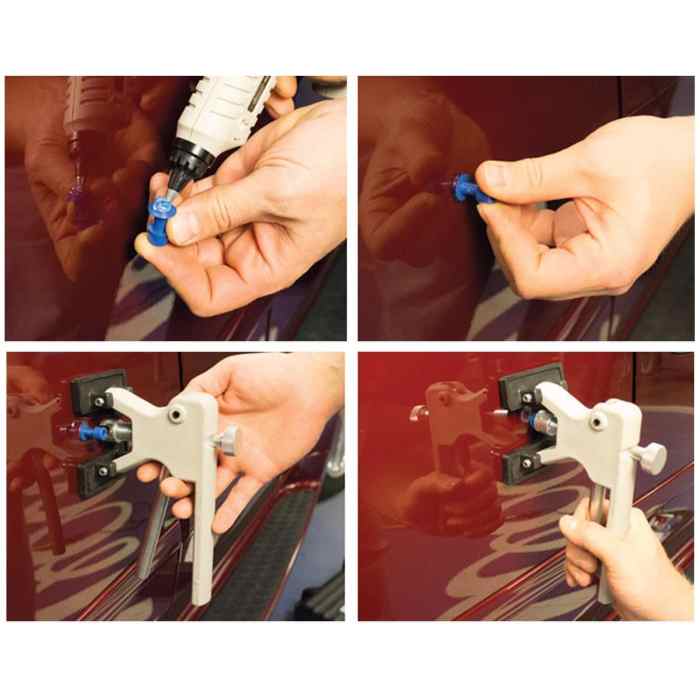
Glue Pullers: These are indispensable for accessing dents in areas difficult to reach with other tools. A specialized glue is applied to the dent, a pulling tab is attached, and then a controlled pulling force is applied to remove the dent. Different sized tabs are crucial for various dent sizes.
Slide Hammers: These are used for larger dents or those accessible from the inside of the vehicle’s panel. The hammer’s controlled force, applied through various attachments, allows for precise dent removal by manipulating the metal from behind.
Lighting Systems: Proper lighting is paramount in PDR. High-intensity LED lights reveal the subtleties of the dent’s shape and allow for accurate assessment and repair. Flexible goosenecks and magnetic bases ensure optimal positioning for various angles and surfaces.
Typical PDR Workflow, Best paintless dent repair tools for pros
The order in which tools are used depends on the dent’s specifics, but a general workflow is illustrated below.
Imagine a flowchart. It starts with Assessment (using the lighting system to thoroughly examine the dent). This leads to Tool Selection (choosing the appropriate tool – glue puller, slide hammer, or a combination). Next is Repair (carefully using the selected tool to remove the dent). Finally, there’s Finishing (using additional tools, like a mini-body hammer, to refine the repair and ensure a flawless finish).
This flowchart would visually represent this process with arrows connecting each stage.
Advanced PDR Tools and Techniques
Stepping up your PDR game means embracing advanced tools and techniques that significantly improve efficiency and results. These tools aren’t just about speed; they enhance precision and allow for repairs on increasingly complex dents. Mastering these tools translates to higher quality work and increased client satisfaction.
The right tools can make all the difference in tackling challenging dents. However, it’s crucial to understand both their strengths and limitations to avoid misapplication or damage. Safety is paramount, especially when working with specialized equipment and adhesives.
LED Lighting Systems in PDR
Effective lighting is critical for precise dent identification and repair. Standard shop lights often cast harsh shadows, obscuring subtle imperfections. LED lighting systems, on the other hand, offer adjustable brightness and color temperature, providing a more even and detailed view of the dent’s shape and depth. This improved visibility allows for more accurate assessment and manipulation of the metal, leading to superior repair quality.
However, the expense of high-quality LED systems can be a limitation for some professionals, and improper placement can still lead to shadowing.
Specialized Suction Cups
Suction cups are fundamental PDR tools, but specialized cups offer advantages for specific dent types and locations. For example, micro-suction cups are invaluable for accessing tight spaces and delicate areas, such as door jambs or around emblems. Larger, heavy-duty suction cups are better suited for pulling out larger dents. However, limitations exist: surface texture, paint condition, and the dent’s geometry all affect the effectiveness of suction cups.
A poorly applied suction cup can lead to paint damage or incomplete dent removal.
Glue Types in PDR
Several glue types are used in PDR, each with specific properties influencing its application and removal. Hot melt glue is a common choice due to its quick setting time and strong bond, allowing for rapid dent removal. However, it requires careful temperature control to avoid burning the paint. Epoxy glues offer a stronger, more permanent bond but require longer curing times and specialized removal techniques.
Choosing the right glue depends on the size and location of the dent, the type of metal, and the desired repair speed.
Glue Application and Removal Procedures
Proper application is crucial for successful glue pull repairs. A consistent bead of glue should be applied to the pull tab, ensuring complete coverage. The pull tab should then be firmly pressed onto the dent, maintaining consistent pressure until the glue sets. Removal involves carefully attaching a puller to the tab and slowly applying tension, avoiding jerky movements that could damage the paint.
For hot melt glue, a specialized glue remover tool is typically used to break the bond, while epoxy glues often require additional solvents or tools for removal.
Safety Precautions for Advanced PDR Tools
Safety should always be prioritized when using advanced PDR tools. Eye protection is essential to prevent injury from flying debris or hot glue. Gloves should be worn to protect hands from hot surfaces and chemicals. Proper ventilation is crucial when using solvents or adhesives that release fumes. Finally, always follow the manufacturer’s instructions for each tool to ensure safe and effective operation.
Ignoring these precautions can lead to serious injury or damage to the vehicle.
Tool Maintenance and Care: Best Paintless Dent Repair Tools For Pros
Keeping your paintless dent repair (PDR) tools in top condition is crucial for efficient and high-quality work. Neglecting maintenance can lead to tool damage, inaccurate repairs, and ultimately, a decrease in your professional reputation. Regular cleaning and inspection are essential for extending the lifespan of your investment and ensuring consistent performance.Proper maintenance of your PDR tools involves a multi-step process that encompasses cleaning, lubrication, and storage.
This routine prevents rust, corrosion, and wear and tear, ultimately saving you money and time in the long run. By following a consistent maintenance schedule, you can ensure your tools remain precise and reliable, producing the best possible results for your clients.
Cleaning and Lubrication Procedures
Cleaning your PDR tools after each use is paramount. Start by wiping down all tools with a clean, lint-free cloth to remove any debris, such as paint, glue residue, or metal shavings. For tools like glue guns, allow them to cool completely before cleaning. Use a specialized cleaning solvent appropriate for the material of your tools (avoid harsh chemicals that could damage the tools).
Pay close attention to the intricate parts of your tools, such as the tips of your rods or the inner workings of your glue guns. After cleaning, apply a thin layer of appropriate lubricant (silicone-based lubricant is often recommended) to moving parts to prevent friction and corrosion. This will ensure smooth operation and extend the lifespan of your tools.
Remember to always consult the manufacturer’s instructions for specific cleaning and lubrication recommendations.
Preventing Damage and Extending Lifespan
Proper storage plays a significant role in tool longevity. Store your tools in a clean, dry, and organized manner. Avoid exposing them to extreme temperatures or direct sunlight. Invest in a sturdy tool case or cabinet with compartments to prevent tools from banging against each other and getting scratched or damaged. When transporting tools, use protective padding to minimize the risk of damage during transit.
Regularly inspect tools for any signs of wear and tear, such as bent rods, damaged tips, or loose parts. Address these issues promptly to prevent further damage and ensure the accuracy of your repairs. For example, replacing worn-out glue gun tips promptly prevents inconsistent glue application and potential damage to the tool itself.
Regular Tool Inspection and Maintenance Checklist
A regular inspection and maintenance schedule is key to preventing costly repairs and downtime. Here’s a checklist you can adapt to your specific tool set and workflow:
- Daily: Wipe down tools with a lint-free cloth after each use. Inspect for any obvious damage.
- Weekly: Thoroughly clean tools with appropriate solvent and lubricant. Check for any loose parts or signs of wear.
- Monthly: Perform a more comprehensive inspection, checking for bends, cracks, or other damage. Sharpen any tools that require it (such as specialized PDR tools).
- Annually: Consider professional servicing for more complex tools, such as specialized lighting equipment or air compressors. Replace any worn-out parts.
Following this checklist will ensure your PDR tools remain in optimal condition, contributing to the quality and efficiency of your work. Remember, preventative maintenance is far more cost-effective than emergency repairs.
Choosing the Right Tools for Specific Dent Types
Selecting the right PDR tools is crucial for efficient and effective repairs. The type of dent, its size, location, and the vehicle’s material all influence tool selection. A mismatched tool can lead to further damage or an unsatisfactory repair. Proper assessment is key to success.Choosing the appropriate tools involves a systematic approach. First, carefully assess the dent’s characteristics: size, depth, location (e.g., panel curvature, proximity to edges), and the vehicle’s material (steel, aluminum, etc.).
Then, consider the accessibility of the dent – can you reach it easily, or will you need specialized tools for hard-to-reach areas? Finally, select tools that are suitable for the specific dent type and material, ensuring they are appropriately sized and designed for the task.
Dent Type and Tool Selection
The following table categorizes various dent types and suggests appropriate PDR tools. Remember that this is a guideline; experience and judgment are essential for making the best tool choice in each situation.
| Dent Type | Dent Size | Location | Recommended Tools |
|---|---|---|---|
| Door Ding | Small | Door panel | Small suction cups, glue pullers, mini slide hammers |
| Hail Damage | Small to Medium | Various panels | Suction cups (various sizes), glue pullers, slide hammers, specialized hail tools (e.g., tap-down tools) |
| Large Dent | Medium to Large | Hood, trunk, quarter panel | Larger suction cups, glue pullers, slide hammers, body hammers, dent removal bars |
| Crease | Variable | Edges, body lines | Specialized crease removal tools, slide hammers, body hammers, tapping tools |
| Deep Dent | Medium to Large | Any panel | Glue pullers (stronger adhesives), slide hammers, body hammers, dent removal bars, potentially additional support tools for lifting |
Case Studies
This section delves into real-world applications of paintless dent repair (PDR) tools, showcasing the step-by-step process for various dent types and complexities. We’ll examine specific tool combinations and techniques used by professionals to achieve optimal results. The case studies highlight the importance of selecting the appropriate tools for each scenario and demonstrate the effectiveness of different PDR methods.
Repairing a Minor Door Ding
This case study focuses on repairing a small dent on a car door using a combination of a slide hammer and a suction cup. The dent, approximately 1 inch in diameter and shallow in depth, is located on the lower portion of the driver’s side door.
So you’re looking for the best paintless dent repair tools for pros? Finding the right tools is key to efficiency, but sometimes, even with the best equipment, you run into unexpected car issues. For example, if a blown fuse causes problems, checking out the cost to replace a car fuse box might be necessary before you can even start working on that dent.
Getting back to those PDR tools, remember that quality is worth the investment in the long run for a professional.
Step 1: Assessment and Preparation. An initial assessment reveals a relatively simple dent with minimal surrounding damage. The area around the dent is cleaned to ensure proper adhesion of the suction cup. (Image description: A close-up photo showing the small dent on the car door. The dent is shallow and circular, with no visible paint damage. The surrounding paint appears smooth and undamaged.)
Step 2: Suction Cup Application. A medium-sized suction cup is carefully attached to the center of the dent. The technician ensures a strong seal to maximize pulling power. (Image description: A picture showing the suction cup firmly attached to the center of the dent. The technician’s hand is visible, ensuring a secure grip on the suction cup.)
Step 3: Slide Hammer Application. A slide hammer is then carefully used to gently pull the dent outwards. The technician uses controlled movements to avoid stretching or damaging the surrounding paint. (Image description: The slide hammer is connected to the suction cup. The technician is gently pulling the slide hammer, applying controlled force.)
Step 4: Refinement and Finishing. After the initial pull, minor imperfections remain. A smaller suction cup and a fine-tipped push rod are used to refine the repair, ensuring a perfectly smooth surface. (Image description: Close-up image of the technician using a push rod to fine-tune the repair. The dent is almost completely removed, with the surface appearing smooth and even.)
Repairing a Complex Dent with Advanced Techniques
This case study involves a significantly larger and more complex dent on a car’s fender. The dent is deep, irregular, and covers a substantial area. Advanced tools and techniques are required for successful repair.
Step 1: Initial Assessment and Planning. The dent’s depth and complexity necessitate a multi-step approach. The technician meticulously assesses the damage, noting the extent of the deformation and the condition of the surrounding paint. (Image description: A photo showing the large, irregular dent on the car fender. The dent is deep and covers a significant area.)
Step 2: Accessing the Dent from Behind. Access to the backside of the panel is gained to allow for better manipulation of the metal. (Image description: A picture showing the technician accessing the back of the fender panel. This might involve removing interior trim pieces or using specialized tools to gain access to the dent’s backside.)
Step 3: Utilizing Specialized Tools. A combination of specialized tools, including a dent lifter, various sized push rods, and a glue pulling system, are employed to manipulate the metal from both sides. (Image description: A photo depicting the technician using a combination of tools, including a dent lifter, push rods, and a glue pulling system. The tools are strategically positioned to work on the dent from both the inside and outside.)
Step 4: Refinement and Finishing. Multiple iterations of pulling, pushing, and refining are needed to achieve a smooth surface. (Image description: A close-up image showing the technician carefully using push rods and other tools to fine-tune the repair. The surface is gradually becoming smooth and even.)
Hail Damage Repair
This case study focuses on repairing hail damage to a car’s hood. Multiple small dents of varying sizes and depths are present, requiring a systematic approach and the use of specialized tools.
Step 1: Assessment and Planning. The extent of the hail damage is assessed, and a repair strategy is developed. The technician prioritizes the dents based on their size, depth, and location. (Image description: A picture showing the car hood with numerous small dents caused by hail. The dents vary in size and depth.)
Picking the best paintless dent repair tools is crucial for pros, ensuring quality work and client satisfaction. Maintaining your car’s health is just as important, so if you’re tackling a DIY project, check out this guide on How to flush a car radiator at home before you get started on that dent. Then, get back to perfecting your PDR skills with the right tools – your clients will thank you!
Step 2: Tool Selection. A variety of tools are selected, including multiple suction cups of varying sizes, a slide hammer, and a selection of push rods. The choice of tools depends on the size and depth of the individual dents. (Image description: A photo showing the various tools that are selected for the hail damage repair, including suction cups, a slide hammer, and push rods.)
Step 3: Systematic Repair. The technician systematically works through the dents, starting with the larger and deeper ones. They carefully use the appropriate tools to manipulate the metal back to its original shape. (Image description: A series of photos showing the technician systematically repairing the dents. The photos illustrate the process of using different tools to address dents of varying sizes and depths.)
Step 4: Final Inspection and Refinement. After all the dents have been addressed, a final inspection is conducted to ensure a smooth and even surface. Any remaining imperfections are carefully addressed. (Image description: A final photo showing the repaired hood. The surface is smooth and even, with no visible dents.)
Cost-Effectiveness and ROI of Professional PDR Tools
Investing in high-quality paintless dent repair (PDR) tools is a strategic move for professional technicians, offering significant long-term cost savings and a strong return on investment (ROI). While the initial outlay might seem substantial, the efficiency, precision, and reduced repair times achieved with superior tools quickly offset the upfront expense. This section examines the financial aspects of choosing professional-grade PDR equipment.The long-term cost savings associated with investing in high-quality PDR tools are substantial.
These tools typically last much longer than cheaper alternatives, reducing the need for frequent replacements. Furthermore, their superior design and functionality lead to faster repair times, minimizing labor costs and maximizing the number of jobs completed per day. High-quality tools also produce higher-quality repairs, resulting in fewer callbacks and warranty issues, saving both time and money in the long run.
A well-maintained, high-end tool kit ultimately translates to a more profitable and sustainable business.
Return on Investment of Different Tool Sets
The ROI of different PDR tool sets varies significantly based on factors such as tool quality, the number of tools included, and the technician’s skill level. A basic set of tools might provide a quicker ROI due to its lower upfront cost, but it may lack the versatility and efficiency of a more comprehensive set. Conversely, a premium set with advanced tools will generally yield a higher long-term ROI due to increased efficiency and reduced repair times, although the initial investment will be higher.
Consider a scenario where Technician A uses a basic set and completes 5 repairs a day at an average profit of $100 per repair, generating $500 daily. Technician B, using a premium set, completes 8 repairs a day at the same profit, earning $800 daily. While Technician B’s initial investment was higher, their daily profit is significantly greater.
Factors to Consider When Budgeting for PDR Tools
Budgeting for PDR tools requires careful consideration of several key factors. First, determine the scope of your work. A technician specializing in small dents will need a different tool set than one handling larger hail damage. Second, evaluate your skill level and training. More advanced tools may be underutilized by a less experienced technician.
Third, research different tool brands and models, comparing features, durability, and warranty offerings. Fourth, factor in the cost of accessories, such as lighting and suction cups, which are essential for efficient work. Finally, allocate a budget for ongoing maintenance and tool replacement to ensure longevity and optimal performance. A well-planned budget will account for these variables and ensure a sound investment in the long term.
Last Point
So there you have it – your complete guide to the best paintless dent repair tools for pros. From choosing the right tools for different dent types to mastering advanced techniques and maintaining your equipment, we’ve covered it all. Remember, investing in quality tools is an investment in your business and your success. Now get out there and start knocking those dents out of the park!